
# Requirement
1. USB 3.0 Debug Cable (A-A crossover, no VBus).
2. 目標機(Target),也就是被除錯機器
Target(SUT) with an xHCI (USB 3.0) host controller that supports debugging.
– UsbView tool (in SDK).
3. 主機(Host):執行除錯工具(windbg)的機器
Host with an xHCI (USB 3.0) host controller.
– WinDBG tool (in SDK).
– WinDBG Preview tool (in Edge Store).
# Steps
1.
首先先下載 [Windows SDK],安裝時可以只選擇 Debugging Tools for Windows 就好。
安裝好後,從 C:\Program Files (x86)\Windows Kits\10\Tools\x64 複製 usbview.exe 至隨身碟。

2.
將 usbview.exe 複製至 Target 機台上執行,開始利用 USB 隨身碟檢查各個 USB 3.x port 是否支援 debug,如果沒有支援,就不用往下走了。
如下,可以看到單一port的能力資訊。
[PortX]
Is Port User Connectable:         yes
Is Port Debug Capable:            yes
Companion Port Number:            3
Companion Hub Symbolic Link Name: USB#ROOT_HUB30#5&32bab638&0&0#{...}
Protocols Supported:
 USB 1.1:                         no
 USB 2.0:                         no
 USB 3.0:                         yes
我們要注意的是 User Connectable 和 Debug Capable 必須要 yes。
從該 port 再往上確認它的 host controller 的 Bus.Device.Function資訊,先記下後面會用到。
USB xHCI Compliant Host Controller
...
DriverKey: {36fc9e60-c465-11cf-8056-444553540000}\0020
...
Bus.Device.Function (in decimal): 0.20.0
3.
確認 Target 機台支援 debug 後,繼續將 Target 的 OS debug 打開。
先想好 TargetName ,避開debug字眼。
用 Administrator 權限的 cmd 執行:
bcdedit /debug on
bcdedit /dbgsettings usb targetname:TargetName
bcdedit /set "{dbgsettings}" busparams b.d.f
可以再執行
bcdedit /enum
bcdedit /v
或是執行 msconfig 來確認。
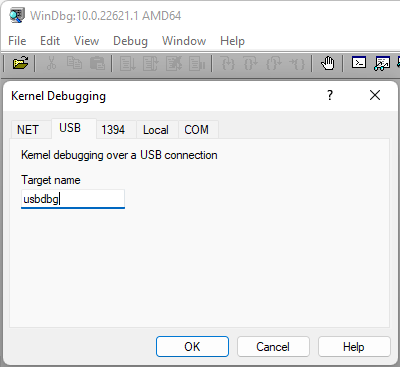
4.
Host 端開啟 WinDbg,要注意使用與 Target 匹配的 x86/x64/ARM 版本。
點擊 File > Kernel Debug…
選擇 USB 頁面,輸入前面在 Target 使用的 Target name,再按 OK。
5.
重啟 Target,Host 等待連線。
當 Target 在 POST 期間不會連線,直到進入 OS 後才會連線。
# 錯誤檢查與排除
1.
檢查 Host 端的 USB Device 狀況,若有 Yellow Bang,可利用 SDK 提供的 driver 重新安裝後再試。
C:\Program Files (x86)\Windows Kits\10\Debuggers\x64\usb

裝置正常的話會顯示為 Usb Debug Connection Device.

2.
關掉 Host 端 USB Device 的 Host Controller 和 Root Hub 上的電源控制。然後重新連接 cable 後再試。
# 官方資料
